
Home
Nails
Showing posts with label Nails. Show all posts
Showing posts with label Nails. Show all posts

Barry M: Nail Polish Haul!
Hey guys,
This week I popped into Superdrug on my lunch break at work (Boots are holding this offer too) and I spotted that all Barry M make up is currently on 3 for 2 and as you probably all know I love their polishes and so I brought 6! This did get me a bit of a funny look from the shop girl and a comment of "oh you have a lot there don't you?" once I got to the till but at the end of the day I was spending my money in their shop so what's the problem?

It total they cost me just under £12 with a saving of just under £6, I then used my NUS student card on top of this and saved my self another £1.25

So here are the colours I chose from left to right (There is no real theme to my colour choices just ones I thought looked nice or that I'm missing from my collection)
Indigo - 312, Blueberry Ice Cream - 306, Teal - 344, Mint Green - 304, Bright Red - 262 and Peach Melba - 318
I haven't tried any of them yet but I definitely think that Teal is going to be a favioutie it has so many colours in it I don't think it will ever get boring.
I hope you have liked seeing into my shopping basket once again and I hope you like the fancy picture (get me!!)
See you on Sunday for this weeks Song of The Week,
Maddie x
This week I popped into Superdrug on my lunch break at work (Boots are holding this offer too) and I spotted that all Barry M make up is currently on 3 for 2 and as you probably all know I love their polishes and so I brought 6! This did get me a bit of a funny look from the shop girl and a comment of "oh you have a lot there don't you?" once I got to the till but at the end of the day I was spending my money in their shop so what's the problem?
It total they cost me just under £12 with a saving of just under £6, I then used my NUS student card on top of this and saved my self another £1.25
So here are the colours I chose from left to right (There is no real theme to my colour choices just ones I thought looked nice or that I'm missing from my collection)
Indigo - 312, Blueberry Ice Cream - 306, Teal - 344, Mint Green - 304, Bright Red - 262 and Peach Melba - 318
I haven't tried any of them yet but I definitely think that Teal is going to be a favioutie it has so many colours in it I don't think it will ever get boring.
I hope you have liked seeing into my shopping basket once again and I hope you like the fancy picture (get me!!)
See you on Sunday for this weeks Song of The Week,
Maddie x
The Christmas Post 2013
Hey guys,
(See you in 2014...)
Twitter | Instagram | Email
So you may have noticed that I haven't posted in the last week or so basically because I have been so busy with family stuff and finishing college I haven't had the chance. I have two Christmases one at mums one at my dads, Boxing Day at my Nan's, the weekend before Christmas at my Nan's for my grandad's birthday, work...do I need to go on?? This is my blogs first Christmas so I have never had to try and fit all this in but I have come up with the master plan!
Each year I will create "The Christmas Post" which will be posted at around 4 o'clock on Boking Day when everything begins to settle down in homes around the country and it will contain lots of wonderful things. Although the things which will be included every year are my favourite Christmas song from that year, my Christmas Day nails, my favourite Christmas Advert (commercial) and a small part of my Christmas Day.
I hope you guys will enjoy this and if you are a blogger who wants to use this idea then please feel free just credit me please :)
So, let's get started with The Christmas Post 2013!
My favourite Christmas song this year has got to be the Bastille Radio 1 Live Lounge Christmas Mash Up. What can be better than your favourite band, creating an ingenious piece of music which combines loads of Christmas songs into something that doesn't sound seriously retro?? Watch it below.
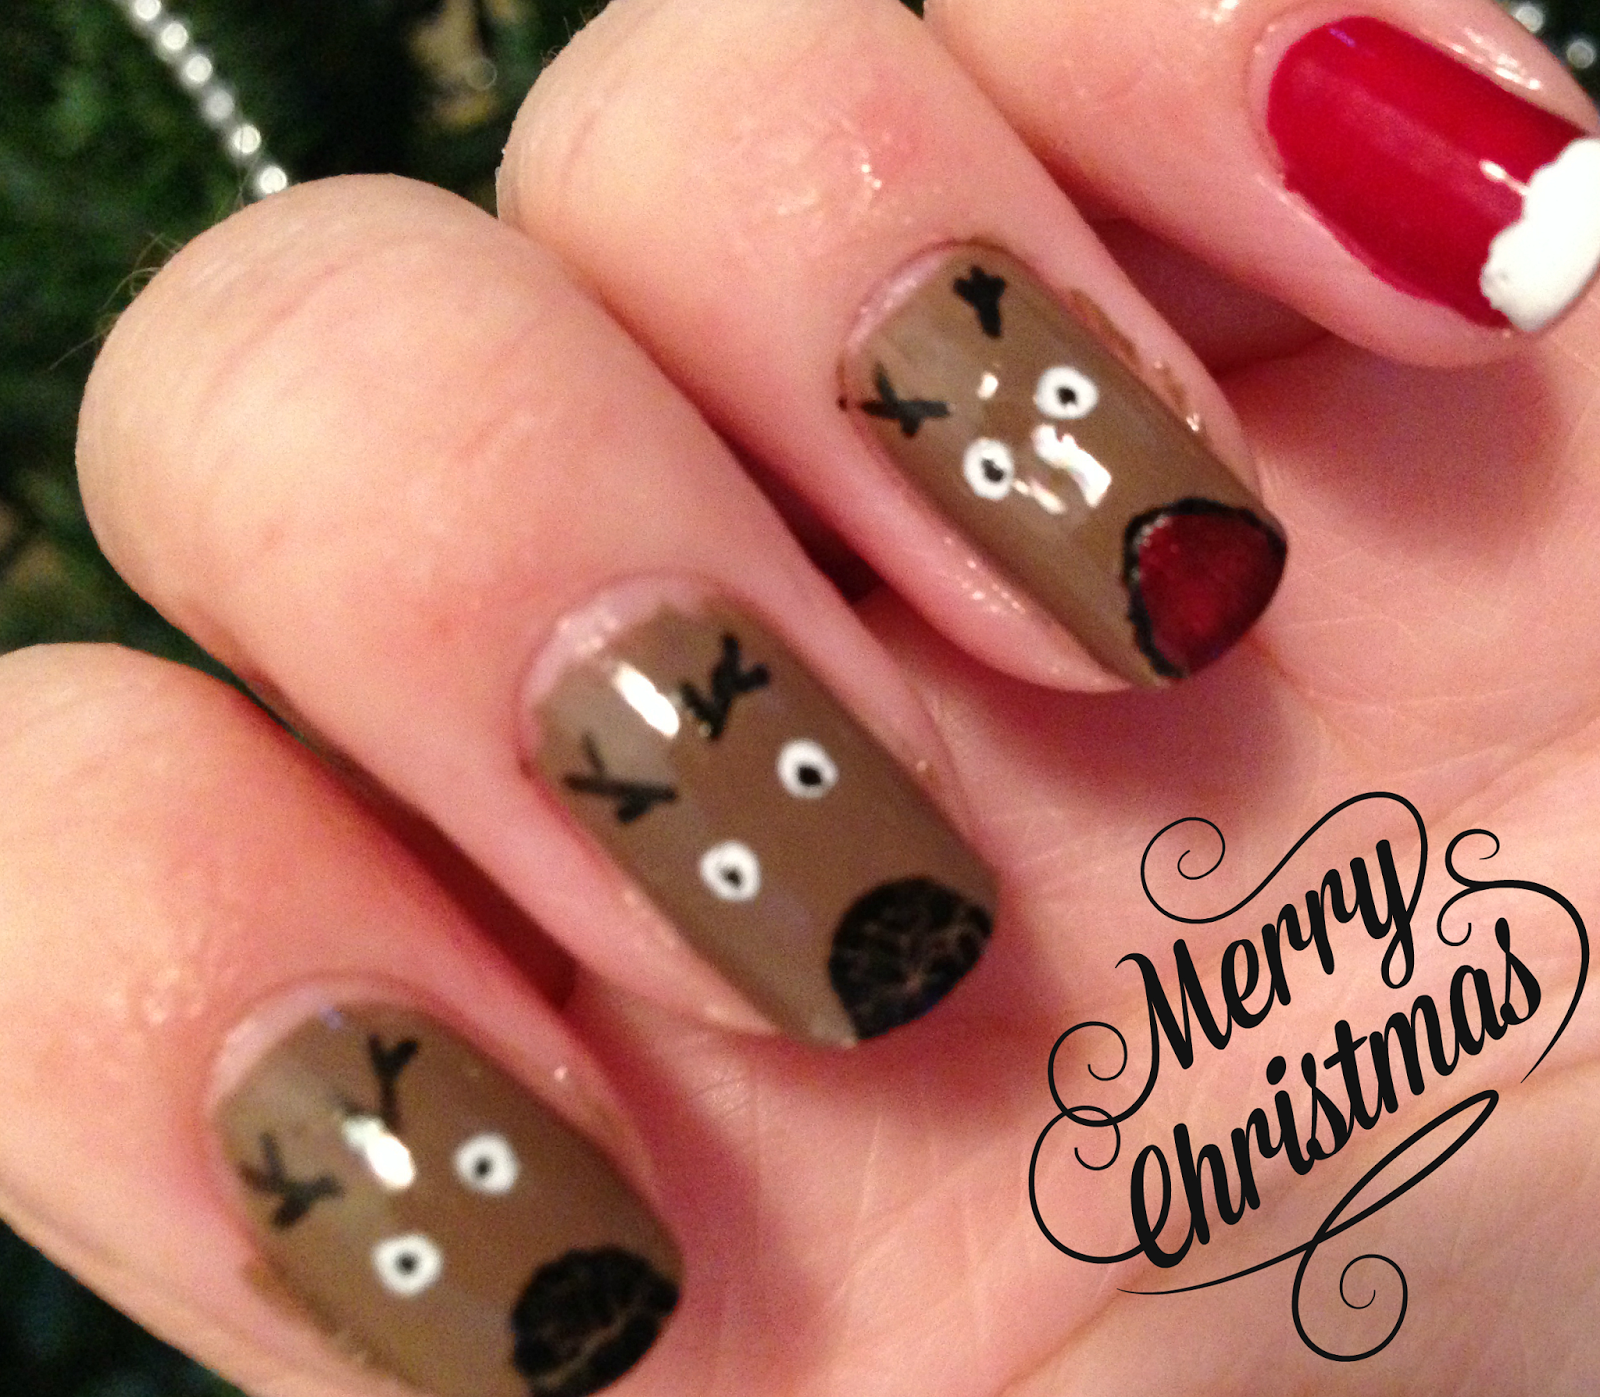
For my Christmas nails this year I have decided to go for a reindeer theme, I have the nine reindeer and Santa. For the detail I used the Barry M nail art pens which worked really well although they do turn into a bit of a crackle polish if you use them for quite a big block of colour.

My favourite Christmas advert this year has got to be the John Lewis Bear and Hare advert, I love the song, the story, the animation and the fact that it isn't trying to sell you something the whole way through. If you haven't seen it already (have you been living under a rock?!?!) watch it below.
For a part of my Christmas Day I thought I would show you my lovely Christmas dinner, there isn't really much to say about this apart from here you go, enjoy! Although I do have to say it was probably one of the yummiest ones I have ever had!
.jpeg)
.jpeg)
So I hope you like this new idea and hopefully it will take the pressure off each Christmas, I won't be posting on Sunday as the only music I am listening to is Christmas music but hopefully we should be back to normal by next Wednesday!
Wishing you all a Merry Christmas and a Happy New Year,
Maddie x
(See you in 2014...)
Twitter | Instagram | Email
Christmas Nails Of The Day #1
Hey guys,
So I know I said that this week was going to be the start of the new series but I have been quite ill over the last few days as well as super busy getting ready for Christmas so I thought I would do a quick little post for you and then sort out an amazing start to the series ready for next week.
So I know I said that this week was going to be the start of the new series but I have been quite ill over the last few days as well as super busy getting ready for Christmas so I thought I would do a quick little post for you and then sort out an amazing start to the series ready for next week.
Nails: A Poundland Mani
Hey guys,
So today I want to tell you about something which I have been meaning to post about for weeks but I have never got round to it because I wanted to photograph my nails with the combination on them again but I haven't had the chance and I wanted to tell you in the hope that some of you lovely readers can get your hands on this deal.
So today I want to tell you about something which I have been meaning to post about for weeks but I have never got round to it because I wanted to photograph my nails with the combination on them again but I haven't had the chance and I wanted to tell you in the hope that some of you lovely readers can get your hands on this deal.
Barry M: Summer Nail Polish Haul
Hey,
Some of you may have seen my instagram picture the other day of some nail polishes I picked up in my local boots so I thought I'd write a quick post to show you which ones I got :)

This is a lovely summer pastel purple which I bought mainly because of my obsession with pastel colours at the moment and because my collection was void of a light purple :( This was just £2.99 and is available here.
I haven't tried any of these yet but I'll keep you posted on what I think of them.
I hope you liked this quick post,
Maddie x
Twitter | Instagram | Email
Some of you may have seen my instagram picture the other day of some nail polishes I picked up in my local boots so I thought I'd write a quick post to show you which ones I got :)

1. Barry M Gelly Hi-Shine Nail Paint in Green Berry (GNP12)
I bought this because it looked like a really nice bright mint green colour and I wanted to try another gelly paint. This was £3.99 and is available from here.
2. Barry M Limited Edition 2013 Nail Paint
This is a limited edition pastel yellow nail paint which I got free. The offer is you can get a free nail paint when you spend £6 on Nail Paints (Or was it any Barry M? I can't remember...). There was this yellow or a hot pink to choose from, this offer is available in Boots and as far as I know is only available while stocks last so you'll need to move fast to make the most out of this offer.
3. Barry M Nail Paint in Berry Ice Cream (NP308)
I haven't tried any of these yet but I'll keep you posted on what I think of them.
I hope you liked this quick post,
Maddie x
Twitter | Instagram | Email
How Tuesday's Nail Tutorial Turned Out...
Heya,
As promised the other day I'm going to do a quick review on how the dotty nail look turned out after 5/6 days.
Before I start I would just like to confess that I do have a slight obsession with picking nail polish once it has started to peal at the edges meaning that when you recreate this look you may well get a few extra days of wear.
In total I got a good five days before they started to show much evidence of wear to them, but once I got to the sixth day it was really time for the polish to come off. All I wanted to do all day was to get home so that I could take it off because they began to look messy and kind of gross.
Overall this was a very long lasting look that survived a game of bowling, washing up, a game of football with my little brother and copieous amounts of hospital strength hand sanitiser from visiting my mum in hospital every day.
All of these products definately have a good life span as I really wouldn't expect a home manicure to last much more than four days so to get five before any signs of wear is excellent.
Sorry this is quick but for a better idea of the quality of the main colour read yesterdays review,
Maddie x
Below is some pictures I took at the end of the 5th day:


As promised the other day I'm going to do a quick review on how the dotty nail look turned out after 5/6 days.
Before I start I would just like to confess that I do have a slight obsession with picking nail polish once it has started to peal at the edges meaning that when you recreate this look you may well get a few extra days of wear.
In total I got a good five days before they started to show much evidence of wear to them, but once I got to the sixth day it was really time for the polish to come off. All I wanted to do all day was to get home so that I could take it off because they began to look messy and kind of gross.
Overall this was a very long lasting look that survived a game of bowling, washing up, a game of football with my little brother and copieous amounts of hospital strength hand sanitiser from visiting my mum in hospital every day.
All of these products definately have a good life span as I really wouldn't expect a home manicure to last much more than four days so to get five before any signs of wear is excellent.
Sorry this is quick but for a better idea of the quality of the main colour read yesterdays review,
Maddie x
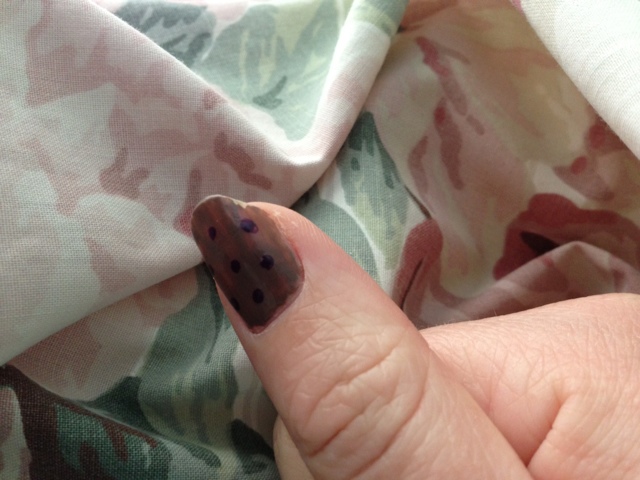
Below is some pictures I took at the end of the 5th day:
 |
| This was probably the worst damage to any of the nails before I started picking at them and was caused by pulling my nail out of the bowling ball too late. |


Cutex: Nourishing Nail Polish Remover Review
Howdy,
So today marks day four of nail related posts, this wasn't intentional but as I will be uploading the reivew of the nail look posted on Monday tomorrow I will have done a weeks worth of nail posts so I hope you have enjoyed and I'm sure there will be many more in the future.
So onto today's product, as mentioned in the dotty nail tutorial I have found a nail polish remover that I absolutely love. It is the Cutex Nourishing Nail Polish Remover for weak nails.
 I bought this stuff in Morrisions (a UK supermarket) when I was staying at my dad's house and realised I had no remover with me if I had a little misshap when painting my nails which undoubtedly I did. I wasn't expecting amazing things after all it was £2.99 however, it is cutex so I wasn't expecting it to be rubbish either.
I literally have nothing bad to say about this product it is nothing but amazing. I ended up buying the weak nails one just because they had run out of the normal one and it's all they had left. Whilst weak nails is something I struggle with it had never crossed my mind that a nail polish remover could help me fix that problem, but two uses later my nails already feel ten times stronger thanks to the added vitamins and minerals. I might just have to paint my nails just so I can use this on my nails and hopefully combat my little problem.
Something, which I have only just noticed whilst sitting do this review is that on the bottle just under the bit about added vitamins and minerals it says that the remover has a nail whitening formula. I hadn't even seen this but looking down at my nails on the keyboard not only are they now stronger the tips are now considerably whiter.
In regard to the job I actually bought this product for it works like a dream, it removes the polish so much easier than the basic shop brand removers I have had before and it smells like vanilla rather than that god awful smell so many other removers have.
I hope you have liked this review on something many beauty bloggers just take as another boring thing in the back of the cupoard. Although, I would call this one of my beauty essentials......in fact I may just add this post to that label now.
Maddie x
So today marks day four of nail related posts, this wasn't intentional but as I will be uploading the reivew of the nail look posted on Monday tomorrow I will have done a weeks worth of nail posts so I hope you have enjoyed and I'm sure there will be many more in the future.
So onto today's product, as mentioned in the dotty nail tutorial I have found a nail polish remover that I absolutely love. It is the Cutex Nourishing Nail Polish Remover for weak nails.

I literally have nothing bad to say about this product it is nothing but amazing. I ended up buying the weak nails one just because they had run out of the normal one and it's all they had left. Whilst weak nails is something I struggle with it had never crossed my mind that a nail polish remover could help me fix that problem, but two uses later my nails already feel ten times stronger thanks to the added vitamins and minerals. I might just have to paint my nails just so I can use this on my nails and hopefully combat my little problem.
Something, which I have only just noticed whilst sitting do this review is that on the bottle just under the bit about added vitamins and minerals it says that the remover has a nail whitening formula. I hadn't even seen this but looking down at my nails on the keyboard not only are they now stronger the tips are now considerably whiter.
In regard to the job I actually bought this product for it works like a dream, it removes the polish so much easier than the basic shop brand removers I have had before and it smells like vanilla rather than that god awful smell so many other removers have.
I hope you have liked this review on something many beauty bloggers just take as another boring thing in the back of the cupoard. Although, I would call this one of my beauty essentials......in fact I may just add this post to that label now.
Maddie x
Barry M Nail Paints: 310 Mushroom Review
Bonjour,
Today I thought I would review the Barry M nail paint that I used in yesterdays tutorial, however it's only going to have the application bit in it because I'm going to do a post in a few days time about how well that look lasted and whether I will do it again.
So, the colour I am reviewing is the colour 310 Mushroom.
 This colour is available direct from Barry M, Boots or Superdrug and I'm sure that many other drug stores stock their products too. This is available for just £2.99 in the UK which is amazing for such a good product.
I actually bought this product quite a long time ago most likely 2011 because I had seen and heard about the limited edition Les Khakis de Chanel which had been released the year before. I loved them but I never really painted my nails very much, I was only 13/14 at the time, wasn't very into beauty and even now there is no way I could justify spending £19 on a nail polish when money is so tight. When I saw this a year later (it was probably out before this I just never bothered looking) it seemed like an almost exact dupe for khaki brun and so I just had to have it not only for me but for my mummy since she was lusting over this the year before just as much as me.
Right, time to get down to the nitty gritty. This stuff is AMAZING there is no other word to describe it, you can tell as soon as you open the lid that it's going to be one of the best things you have ever had on your nails, it's so thick but at the same time not gloopy. Once you have a base coat on (always advised to avoid staining) you can get away with just one coat and it covers your nails without the colour being patchy, missing in places or having that clear effect at the ends. However, if you decide to go the whole hog and do two coats you will get a lovely finish which is almost that of a gel manicure. No matter how many coats you decide to put on it has a lovely shine even without a top coat. Once you have added a top coat its as shiny and smooth as a new car. It's long lasting too, you can easily get 5-7 days wear from it although it does begin to chip a little round the edges towards the end of the week.
One of the few problems I found with it was that when you want to clean up after you have painted it's a nightmare to get off round the edges but I suppose that's a good thing because it means it won't come off your nails straight away. The only other problem is that with a base coat, two coats of colour and a top coat it takes a while to dry but then seems like it is dry after a good 10-20 minutes but actually it's still very wet underneath meaning it's easy to smudge.
So overall, this is a lovely polish just make sure it's completely dry before you try to do too much and be careful not to get it on your fingers too much.
Hope you have all enjoyed, I am aware that this product has been out a long time but I have found from reading beauty blogs that bloggers very often only review "in" products and don't do in depth reviews on the basic products that everyone loves. I also want to make sure that I feature cheap products and not ones that people only have because they have been sent to them for free meaning that the rest of us will have to sell an arm and a leg to buy.
Look out for another nail related review tomorrow.
Maddie x
Today I thought I would review the Barry M nail paint that I used in yesterdays tutorial, however it's only going to have the application bit in it because I'm going to do a post in a few days time about how well that look lasted and whether I will do it again.
So, the colour I am reviewing is the colour 310 Mushroom.

I actually bought this product quite a long time ago most likely 2011 because I had seen and heard about the limited edition Les Khakis de Chanel which had been released the year before. I loved them but I never really painted my nails very much, I was only 13/14 at the time, wasn't very into beauty and even now there is no way I could justify spending £19 on a nail polish when money is so tight. When I saw this a year later (it was probably out before this I just never bothered looking) it seemed like an almost exact dupe for khaki brun and so I just had to have it not only for me but for my mummy since she was lusting over this the year before just as much as me.
Right, time to get down to the nitty gritty. This stuff is AMAZING there is no other word to describe it, you can tell as soon as you open the lid that it's going to be one of the best things you have ever had on your nails, it's so thick but at the same time not gloopy. Once you have a base coat on (always advised to avoid staining) you can get away with just one coat and it covers your nails without the colour being patchy, missing in places or having that clear effect at the ends. However, if you decide to go the whole hog and do two coats you will get a lovely finish which is almost that of a gel manicure. No matter how many coats you decide to put on it has a lovely shine even without a top coat. Once you have added a top coat its as shiny and smooth as a new car. It's long lasting too, you can easily get 5-7 days wear from it although it does begin to chip a little round the edges towards the end of the week.
One of the few problems I found with it was that when you want to clean up after you have painted it's a nightmare to get off round the edges but I suppose that's a good thing because it means it won't come off your nails straight away. The only other problem is that with a base coat, two coats of colour and a top coat it takes a while to dry but then seems like it is dry after a good 10-20 minutes but actually it's still very wet underneath meaning it's easy to smudge.
So overall, this is a lovely polish just make sure it's completely dry before you try to do too much and be careful not to get it on your fingers too much.
Hope you have all enjoyed, I am aware that this product has been out a long time but I have found from reading beauty blogs that bloggers very often only review "in" products and don't do in depth reviews on the basic products that everyone loves. I also want to make sure that I feature cheap products and not ones that people only have because they have been sent to them for free meaning that the rest of us will have to sell an arm and a leg to buy.
Look out for another nail related review tomorrow.
Maddie x
Spring Nail Tutorial/ Dotty Nails WITHOUT A Dotting Tool...
Hey guys,
So this is what I was meant to post yesterday but then I ended up rambling about a load of stuff but today I'm just going to go straight into it.
The colours I am using are Nail Paint by Barry M in colour 310 Mushroom and 17 Lasting Fix Nail Polish in the colour Royal Indigo.
So this is what I was meant to post yesterday but then I ended up rambling about a load of stuff but today I'm just going to go straight into it.
The colours I am using are Nail Paint by Barry M in colour 310 Mushroom and 17 Lasting Fix Nail Polish in the colour Royal Indigo.
- First things first, remove any nail polish that you already have on with a good quality remover (It doesn't have to be expensive just good quality).

This is my current remover of choice it's the Cutex Nourising Nail Polish Remover. - Next you need to file your nails to the shape you want them, it looks better if you make them all the same shape (e.g. all square or all rounded) however, if your like me and some of your nails are naturally square and some natually rounded you are better to keep them that way rather than drastically changing them.


This is what your nails should be looking like after the first two steps. - Now it's time to get painting apply a base coat to your nails and then add the base colour which for me is the Mushroom. Once you have done one coat of the colour add another and then leave to dry for 20-30 minutes.

This is a cheapy from Boots but it has lasted ages and has amazing coverage.
It is the: 17 Nail Xtras Strenthening Base Coat

(Excuse the mess :L) - Here comes the fun part!! It's dotting time...I don't own a dotting tool and I'm not sure that I want to they are expensive and hard to find yet you can achieve the same effect by using items around the home. Here are a few things you can use: - Spaghetti (non-cooked of course), The end of a bobby pin when it is split and my personal favourite a coctail stick with the point bit cut off. The advantage of the coctail stick is that you don't have to look for different sizes because you can just cut as far up as you want for the size of the dot you want.
- Once you have chosen your tool you need to take the top off of the nail polish and rather than dipping it in the pot (which is not only messy but wasteful) run the end of your tool through the center of the brush. When you have done this you can start dotting...
- Choose the pattern you want and begin dotting on your nail, you will need to keep adding more polish to your tool for best results add more each dot or everyother. TOP TIP: Don't push your tool into the colour underneath as it will still be tacky and then you will ruin your nails. You want to either very gently touch the stick to your nail or hover just above the nail and wait for some polish to drop off the tool.

I went for three dots and then polka dots on my thumbs but feel free to experiment! - Your look is now complete! Just add a top coat to protect the polish and help it last longer. TOP TIP: When applying nail polish especially top coat paint the end and slightly underneath your nail to seal the polish and stop water etc. getting in and under the surface.
Thanks for reading feel free to add ask and questions in the comments and I'll try and get back to you.
This is from the same range as the base coat and is just as amazing.
It is the: 17 Nail Xtras Double Gloss Top Coat.
|
| I have had this a few years now but I think you can still buy this quite easily in your local boots or superdrug. |
 |
| I believe that this was a free polish in one of their by so many items get a set free meaning you can't purchase it anymore however, I do believe they have a simialr colour. |


Maddie x

Nails ramble/Why I love painting my nails....
Holla mis amigas,
As it's been the Easter holidays I've been loving painting my nails and for two reasons really:
1. At school we aren't allowed ANY nail polish AT ALL! Okay, slight exaggeration you can get away with clear or nail bite etc. and actually in the last few months quite a few people have got away with a frenchie so maybe the times are changing. What I'm trying to say though is that, the minute the teachers see the tiniest bit of colour you are dragged to the staff room to get the nail polish remover and it's cleaned off in a flash. There used to be the trick that you could say you couldn't get it off but even that doesn't work any more because the science teacher (my form tutor) has pure acetone in her cupboard :(
2. I just love doing my nails, giving them a bit of colour and a bit of a spruce up in the holidays is always lovely.
Okay so maybe there is three reasons....
3. As you should all know from my other posts my prom is coming up which means I am spending rather a lot of money to get gel nails for that day and I don't want my nails to be nonexistent when I paying that much. So my hope is that if I look after my nails and always have at least a base coat on then they won't snap and break as much and I might actually have something there for the nail lady to paint.
So this was meant to be the lead in to a tutorial but it's turned into a bit of a ramble so I will post the turtorial tomorrow instead.
Maddie x
Subscribe to:
Posts
(
Atom
)